Bleeding Out
6 years ago How-To
How to purge the air out of braking systems.
When a routine brake job is performed (pads and/or shoes, and maybe the rotors/drums, are replaced), the brake system should be bled to remove any residual air in the brake lines. In most cases, very little, if any, air will be present. That likely means that the hydraulic system is not opened to allow air to enter into it.
When a brake system repair requires that the hydraulic system be opened, air will enter the system. This air must be purged. Examples of such repairs include replacing the caliper and/or wheel cylinder, installing a new master system and replacing the ABS accumulator. Failure to purge, or bleed, this air from the hydraulic system can result in a soft, spongy brake pedal feel and reduced braking performance.
ABS Braking Basics
Under normal braking conditions (dry roads, normal speeds), the ABS (antilock brake system) functions the same as a standard base brake system with a diagonally split master cylinder and conventional vacuum assist (also known as power brakes). The brake pedal is pushed and the hydraulic pressure is applied equally at each wheel to stop the vehicle.
ABS mode is activated when the locking tendency for one or more wheels is detected during application of the brakes (meaning one or more wheels will lock when braking on ice or snow). During ABS braking, the hydraulic pressure is not the same; rather, it is regulated to prevent any wheel from locking. The Hydraulic Control Unit (HCU) controls the flow of brake fluid using a series of valves and accumulators. The pressure is regulated by the Integrated Control Unit (ICU). (The HCU is commonly known as the accumulator and is part of the ICU.)
The system can build and release hydraulic pressure at each wheel, depending on the signals generated by the Wheel Speed Sensor (WSS) at each wheel and received at the Antilock Brake Module (ABM). In the days before ABS, this buildup and release of hydraulic pressure was accomplished by the driver pumping the brake pedal pump furiously and repeatedly. The ABS is doing the same thing (pumping the brake pedal), except it is being done much faster than humanly possible.
In a nutshell, that is how the ABS works. And, as is the case with a base brake system (no ABS), air in the HCU will prevent proper, and safe, braking performance. It should be noted, though, when the HCU is replaced, the entire brake system must be bled because the brake system has now been opened and air has been allowed in.
Bleeding the ABS
Brake systems with ABS must be bled as two independent braking systems. The non-ABS portion of the brake system (base system) with ABS should be bled the same way as any non-ABS braking system. The ABS portion of the brake system must be bled separately.
NOTE: During the brake bleeding procedure, be sure that the brake fluid level remains close to the FULL level in the master cylinder fluid reservoir; check the fluid level periodically during the bleeding procedure; add Mopar® DOT 3 brake fluid as required.
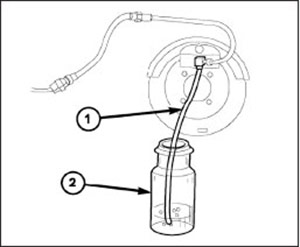
When bleeding the ABS, the following sequence of steps must be followed to ensure complete and adequate bleeding. First, make sure all hydraulic fluid lines are installed and properly torqued. Then, connect the scan tool to the diagnostics (OBDII) connector. Check to be sure there are no stored fault codes for the ABM. Next, attach a clear tube (1) to the bleeder screw on the first wheel to be bled. Submerge the end of the tube in a clear container (2) filled with clean brake fluid, as shown in Figure 1.
Figure 1 – Tube connected to the bleed screw
Bleed the base brake system. Pressure bleeding is recommended to ensure all air has been purged from the system. Manual bleeding can also be utilized, but additional time will be required. The brakes should be bled in the following sequence:
- Left rear wheel
- Right front wheel
- Right rear wheel
- Left front wheel
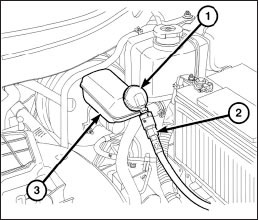
If pressure builds when bleeding the base system, attach the fluid hose from the pressure bleeder (2) to the special cap (1) on the master cylinder (3) (see Figure 2). Open the bleeder screw at least one full turn to obtain a steady stream of brake fluid. After approximately 4-8 ounces of brake fluid has been bled, close the bleeder screw.
NOTE: Be sure the flow of brake fluid is free of air before closing the bleed screw.
Figure 2 – Pressure bleeder
Check and adjust the brake fluid level to the FULL mark on the reservoir before proceeding to bleed the next wheel. Bleed all four wheels, then check the feel of the brake pedal. It should be solid. If the feel is spongy or soft, air is still present.
If the brakes are being bled manually, have a helper pump the brake pedal three or four times, then hold down the brake pedal. Open the bleeder screw. When the brake pedal drops, close the bleeder screw. Release the brake pedal. Repeat this step until all the air is removed from that wheel circuit. Check and adjust the brake fluid level. Bleed the remaining three wheels in the same manner. Check the feel of the brake pedal. It should be solid. If the feel is spongy or soft, air is still present.
After bleeding the base brake system, bleed the ABS portion of the brake system. For discussion purposes, the specific vehicle being referenced is a 2012 minivan. Check the service manual for the vehicle being repaired for specific scan tool displays. Using the scan tool, select ECU VIEW, then select ABS MISCELLANEOUS FUNCTIONS to access the bleeding procedures. Follow the instructions displayed on the scan tool. When finished bleeding the ABS system, disconnect the scan tool.
NOTE: The ABS section of the brake system cannot be bled without the use of the scan tool; there are no manual procedures for bleeding the HCU.
With the ABS bleeding completed, bleed the base brake system a second time using the same procedures that were outlined for bleeding the base brake system the first time. Once again, check the fluid level in the master cylinder and be sure that it is at the FULL level.
To complete the brake bleeding procedures, test drive the vehicle to check the brake performance. The brakes should operate properly and the brake pedal should feel firm, not soft or spongy. If some sponginess is detected, repeat the bleeding procedure.