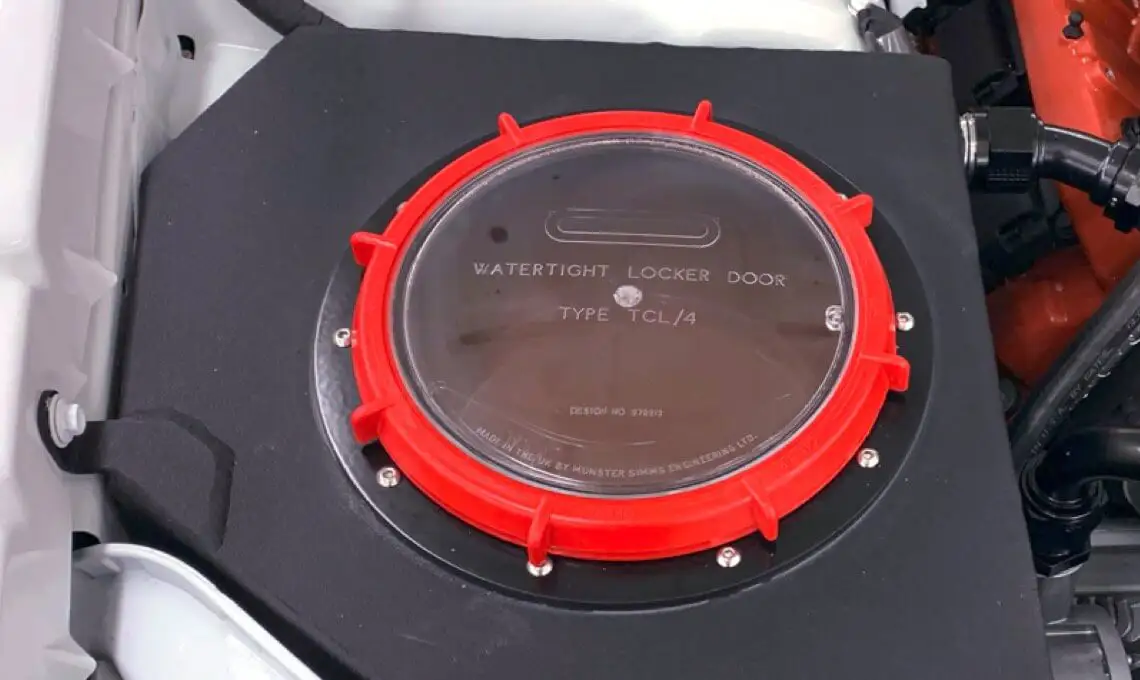
Competition Setup

 Fueling Image

Fueling

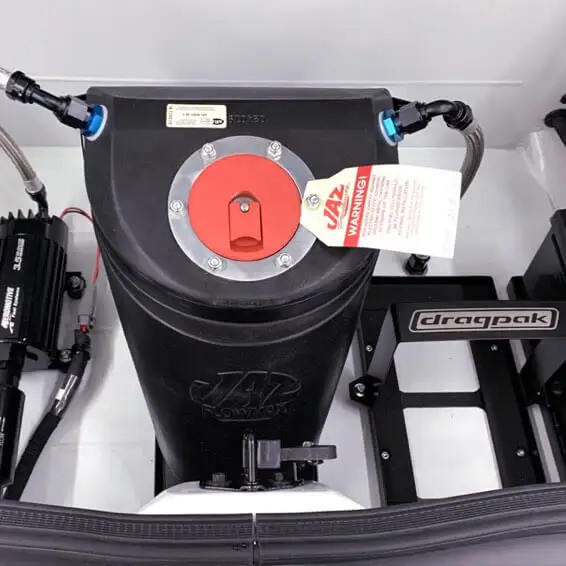
The fuel cell on the 2021 Drag Pak has a three-gallon capacity and is mounted in the trunk of the vehicle. Only use VP C16 Race Fuel, as the electronics are specifically calibrated for this type of fuel. Make sure the fuel cell is full prior to each run to eliminate a potential fuel starvation situation, as engine damage could occur.


Radiator and intercooler operation and filling

The 2021 Drag Pak’s cooling system is filled with a 50/50 premixed Mopar® coolant (part number 68051218AB) during final assembly. This is to protect the engine, radiator and intercooler during transportation. Before racing the Drag Pak, it’s important to familiarize yourself with local track and event requirements. Many do not allow the use of antifreeze. It’s recommended to completely empty your cooling system and fill with distilled water only. Tap water may cause corrosion to certain parts.

To completely empty your cooling system for the first time:

  1. Remove the intercooler tank cap.
  2. Remove the lower radiator hose that's connected to the electric water pump and let all of the coolant run out.
  3. Remove the radiator cap and pour distilled water into the radiator to flush the rest of the coolant.
  4. Put the radiator hose back on the pump, making sure not to overtighten it.
  5. Pour 3-4 gallons of distilled water into the radiator at the cap, and put the cap back on.
  6. Fill the intercooler 1/3 of the way full with water and turn the water pump on. If you hear an audible noise from the water pump and/or intercooler pump when the engine is off, air could still be trapped in the system. Squeeze the lower radiator hose to release trapped air.
  7. Visually check the water level and add more if needed to avoid starving the intercooler pump.
  8. Fill the remaining 2/3 of the intercooler tank with ice.
  9. After your run, use an electric pump to siphon out the intercooler.

NOTE: Be sure to completely dry off all surfaces. Using compressed air is recommended.

NOTE: Be sure to drain the coolant system and re-fill with a 50/50 mix of coolant and water prior to exposing the vehicle to sub-freezing conditions.

NOTE: When filling the intercooler tank, make sure a combination of both water and ice is used. Intercooler and/or pump failure and possibly engine damage could occur if only ice is used.


Front and rear tires – air pressure

Drag Pak Front Driver's Tire and Wheel Well
Drag Pak Rear Driver's Tire and Wheel Well

The 2021 Drag Pak is equipped with Mickey Thompson ET Front 27.5X4.0-17-inch front runners and 30.0X9.0R 15-inch ET Drag® Pro Drag Radial rear slicks. This tire combination is common to both the BOGART Base Wheel Kit and WELD Racing Beadlock Wheels available on the Drag Pak.

Regardless of which wheel combination the car has, the vehicle will be delivered with 40 psi in the front, and 20 psi in the rear. Mickey Thompson suggests a pressure range of 35-40 psi in the front, and 18-20 psi in the rear. Track temp and conditions will have the greatest impact on the optimal pressure. It’s recommended to check the air pressure in the pits and on final check in the staging lanes prior to making a pass.

NOTE: The track temperature will also affect the type of burnout needed to properly heat the slicks. On a hot track, a long burnout is not necessary. Dropping the air pressure in the slicks when the starting line is hot will help with launching the Drag Pak. The optimal life of the rear slicks is between 15-25 runs. Make it a point to mark the slicks with a silver marker after each run. If equipped with BOGART Base Wheel Kit, use shoe polish to mark both the rear wheel and the slick to check for tire slippage. Recording a video of your launches is helpful for tuning.


Chassis Setup

Drag Pak Chassis Setup

Front and rear alignment

FRONT: The Drag Pak comes pre-aligned. Caster, Camber and Toe are pre-set, but for best performance and tracking, the front Toe-In should be 1/8” positive when aligned at race weight. Use the driver and/or ballast to achieve the correct “as-raced” weight.

REAR: The rear-end alignment should be performed with the rear anti-roll bar disconnected. The lower links are fixed and non-adjustable. It’s important to center the axle in the car. Poor alignment may cause damage to the rear wheels and tires due to contact with the body.

NOTE: The axle should be centered in the car by using the wishbone link. With all the links installed, adjust the length of the rod ends on either side of the wishbone. These will need to be unbolted from the chassis, adjusted and re-installed. The center measurements can be taken from the outside flange of the axle bracket to the frame rails. Once the axle is centered in the car, tighten jam nuts on rod ends.


Ride Height & Damping Adjustment

Drag Pak Ride Height and Damping Adjustment

Ride Height

The Drag Pak’s ride height can be adjusted by the preload on the front and rear springs on the coilovers by using a special spanner wrench from Bilstein (part number B4-XS1-Z001A00). Make sure to tighten the lock ring against the preload ring when you’re finished adjusting preload. Click here for more tech info from Bilstein on the struts and shocks.

Once you’re familiar with the suspension adjustments, a recommended ride height is:

  • Front: 27-3/4"
  • Rear: 28" measured from the ground to highest point at the center of the wheel arch.

The rear shock brackets have multiple holes for various bracket settings, but it's recommended to keep the position of the bolt as delivered.

Damping adjustment

The 2021 Drag Pak features double-adjustable coilover dampers at the front and rear. The dampers have adjustment knobs that allow for easy adjustment of damping force. Damping force can be adjusted by turning the knobs in increments of 1 (least force) to 10 (most force) as shown in the picture. A good starting point is to set all damping adjustments to 5.

  • The Blue Knob adjusts damping in jounce (or compression).
  • The Red Knob adjusts damping in rebound (or extension).

NOTE: Adjustments should be made in small increments, as excessive suspension travel can cause severe damage to numerous components.


Pinion Angle & Anti-Squat

Pinion Angle

This can be set by adjusting the heim joints on the upper control arms and using a digital level to check the angle between the driveshaft and the flat face of the third member on the rear differential. A good starting point is to have the car on a flat surface like an alignment rack or drive-on hoist. The pinion angle should measure between negative 1 and 1.5 degrees. When making these adjustments, make sure the heim joints have proper thread engagement when adjusting the upper control arms. Make sure to tighten jam nuts once adjusted. Measure both arms and make sure they are equal.

NOTE: Excessive pinion angle may cause premature failure of driveline components.

Drag Pak Anti-Squat - 01
Drag Pak Anti-Squat - 02
Drag Pak Anti-Squat - 03

Anti-Squat

Anti-squat behavior can be changed by moving the rear upper control arm mounting locations. There are five holes on the rear upper control arms that will allow for more or less anti-squat depending on track conditions. The rate of anti-squat is controlled by the shock compression/rebound damping.

NOTE: The Drag Pak is delivered with the rear upper control arms in the center (middle) position.


Pre-Load & Anti-Roll Bar

Pre-Load

The Drag Pak is delivered with the rear suspension in a neutral pre-load setting. To confirm, the rear upper and lower control arms should be easy to turn. If track conditions dictate pre-load for more traction, it can be set by shortening or lengthening the passenger-side upper control by loosening the jam nut and turning the control arm.

Anti-Roll Bar

The Drag Pak is delivered with an anti-roll bar in the rear. It features adjustable end-links/heim joints that can be used to adjust wheel loads if desired. It’s recommended that the rear end be aligned with the anti-roll bar disconnected. Don’t forget to re-attach the end-links to the axle once alignment is complete.

NOTE: Adjustments should be made in small increments. Keep a log book of all changes.


Wheelie Bar Alignment

Drag Pak Wheelie Bar Alignment

The adjustable wheelie bar may be raised or lowered for either competition or transportation in and out of the trailer. The wheelie bar height should be measured from the ground to the center of the wheel.

NOTE: Ensure enough clearance exists between the body and the wheelie bars when the suspension articulates to prevent potential contact and damage.


Parachutes, Safety Harness, & Window Net

It is the operator’s responsibility to understand and properly use all of the safety equipment on the 2021 Drag Pak. Please check that all safety systems in the vehicle are in good condition and are set up to fit each driver, per the rules and regulations set by the competition sanctioning body.

Parachute

It's important the parachute deployment system is always functioning before each pass. To deploy, pull back on the lever, which will release the spring-loaded parachute. For instructions on care, repacking and more, download this PDF.

NOTE: Remove parachute safety pin before each pass.

Safety Harness & Window Net

Before driving the vehicle, the safety harness must be adjusted to fit each individual. It’s best to have someone help with tightening belts and checking the window net. For more information on setting up the harness, refer to the instructions from the manufacturer that are provided with the vehicle.

NOTE: The passenger seat is provided for compliance with NHRA Stock class rules and is not intended for occupant use.

NOTE: The safety harness and window net are date stamped for validity and will need to be replaced or re-certified for competition use per the rules and regulations set by the sanctioning body.


Roll-Bar Padding

The Drag Pak is delivered with two different sizes of SFI-certified roll bar padding in the trunk for operator installation on the roll cage. This padding must be installed in any areas of the roll cage where the driver’s helmet may contact roll cage components. Consult your racing sanctioning body’s rulebook for more information.

1